Token Authentication Login
Overview
PicoClaw supports multiple Token authentication methods for securing Gateway API access and Web console login. This document explains how to configure and use Token authentication features.
Pico Channel Token Authentication
Pico Channel is PicoClaw's native WebSocket protocol channel that supports Token-based authentication.
Configuration Methods
Method 1: Configuration File
Configure in ~/.picoclaw/config.json:
{
  "channels": {
    "pico": {
      "enabled": true,
      "token": "your-secure-token-here"
    }
  }
}
Method 2: Environment Variable
export PICOCLAW_CHANNELS_PICO_TOKEN="your-secure-token-here"
Method 3: Security Configuration File (Recommended)
Configure sensitive information in ~/.picoclaw/.security.yml:
channels:
  pico:
    token: "your-secure-token-here"
Security Tip: We recommend using
.security.ymlto store sensitive tokens. This file should be added to.gitignore.
Authentication Methods
Pico Channel supports three Token authentication methods:
| Method | Description | Use Case |
|---|---|---|
| Authorization Header | Authorization: Bearer <token> | Server-side calls, API clients |
| WebSocket Subprotocol | Sec-WebSocket-Protocol: token.<value> | Browser WebSocket connections |
| URL Query Parameter | ?token=<token> | Simple scenarios (requires explicit enable) |
1. Authorization Header
Include Token in HTTP request header:
curl -H "Authorization: Bearer your-secure-token-here" \
  http://localhost:18790/api/endpoint
2. WebSocket Subprotocol
Specify subprotocol when establishing WebSocket connection:
const ws = new WebSocket('ws://localhost:18790/pico', ['token.your-secure-token-here']);
3. URL Query Parameter
Note: This method is disabled by default and must be explicitly enabled.
Enable URL Query Token:
{
  "channels": {
    "pico": {
      "enabled": true,
      "token": "your-secure-token-here",
      "allow_token_query": true
    }
  }
}
Usage:
const ws = new WebSocket('ws://localhost:18790/pico?token=your-secure-token-here');
Security Warning: URL Query parameter method may expose tokens in logs and browser history. Use with caution.
Complete Configuration Options
{
  "channels": {
    "pico": {
      "enabled": true,
      "token": "your-secure-token-here",
      "allow_token_query": false,
      "allow_origins": ["https://your-app.com"],
      "ping_interval": 30,
      "read_timeout": 60,
      "write_timeout": 60,
      "max_connections": 100
    }
  }
}
| Option | Type | Default | Description |
|---|---|---|---|
enabled | bool | false | Enable Pico Channel |
token | string | - | Authentication token (required) |
allow_token_query | bool | false | Allow passing token via URL query |
allow_origins | []string | [] | Allowed origins list; empty allows all |
ping_interval | int | 30 | WebSocket ping interval (seconds) |
read_timeout | int | 60 | Read timeout (seconds) |
write_timeout | int | 60 | Write timeout (seconds) |
max_connections | int | - | Maximum connections |
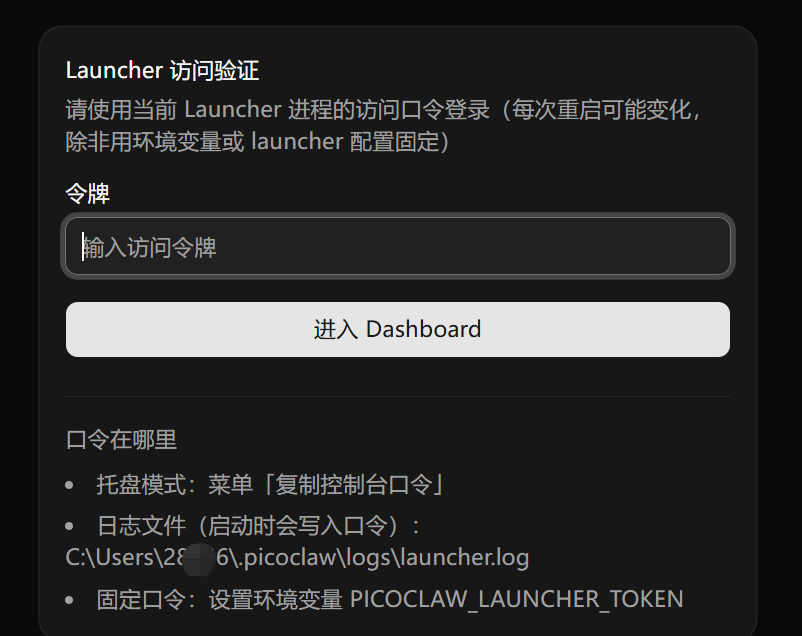
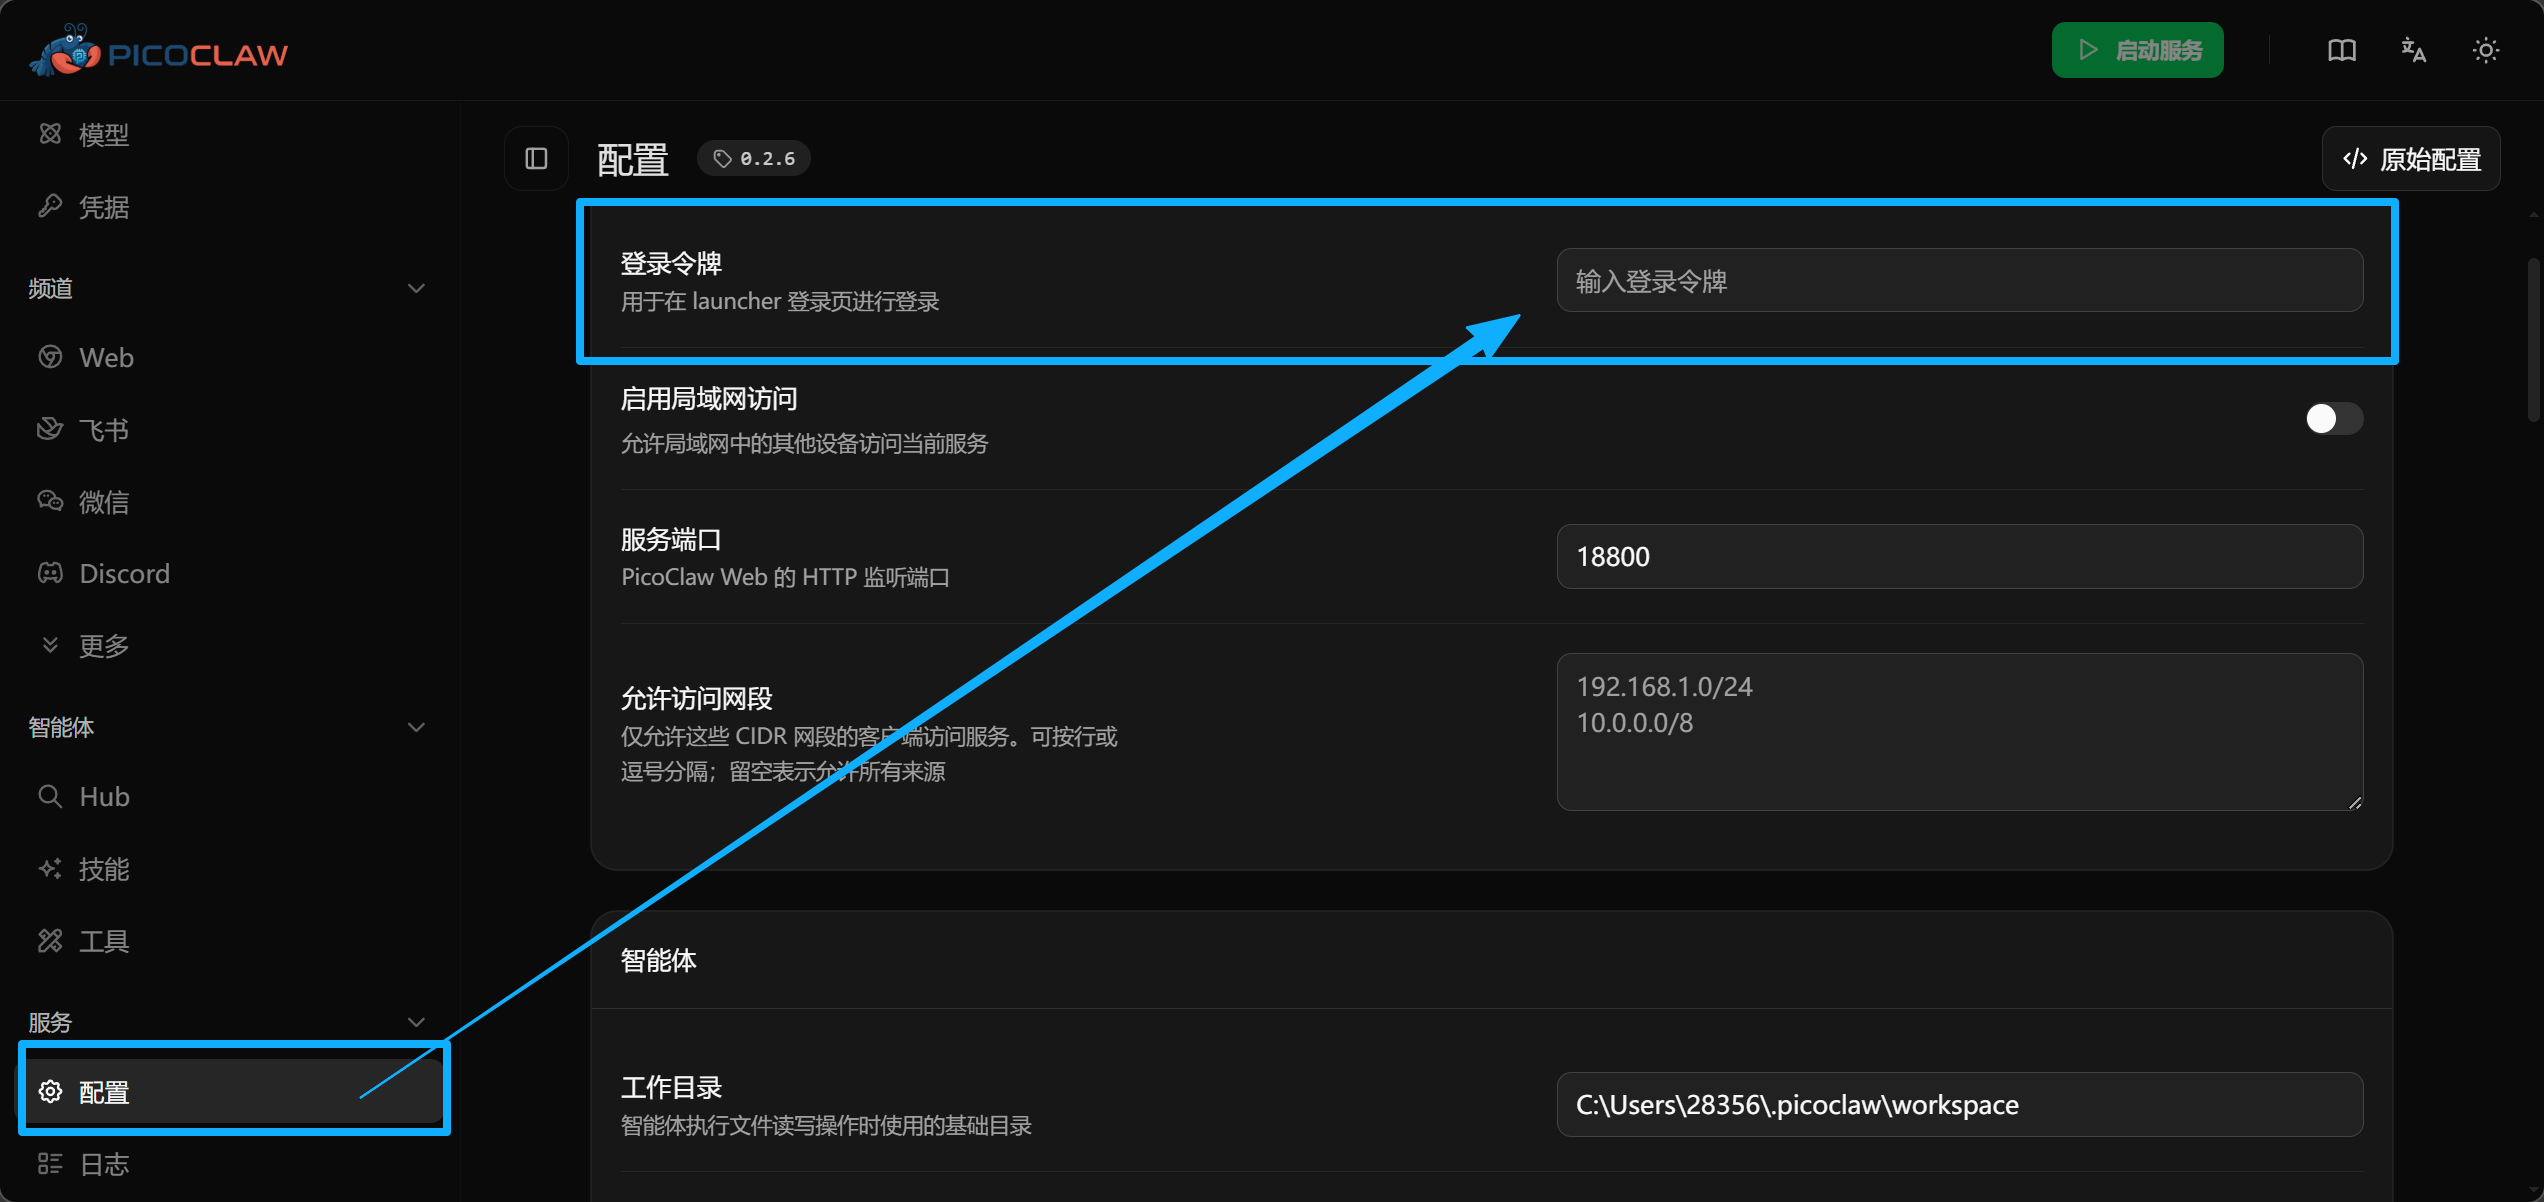
Web Launcher Dashboard Token
The Web Launcher Dashboard exposes a standard HTTP login / setup / logout flow guarded by a single token. The same token also signs the dashboard session cookies.
Token Resolution Order
At startup the launcher resolves the dashboard token from these sources, in priority order:
PICOCLAW_LAUNCHER_TOKENenvironment variable — highest priority. When set, this value is used and not echoed to logs.launcher_tokenfield inlauncher-config.json— persisted across restarts. This is the default once you set a custom token through the dashboard or by editing the file.- Random token (fallback) — only used when neither of the above is present. PicoClaw generates a 256-bit random token, persists it to
launcher-config.json, and reuses it on the next start.
The source of the active token is reported as one of env, config, or random in the launcher logs at startup, so the token persists across restarts unless you explicitly rotate it.
Viewing the Token
- Console mode (
-console): the token (or its source) is printed at startup - Tray/GUI mode: use "Copy Console Token" from the tray menu
- Log file:
$PICOCLAW_HOME/logs/launcher.log - launcher-config.json: read the
launcher_tokenfield directly
Setting a Fixed Token
Two ways:
Environment variable (overrides everything else, not persisted):
export PICOCLAW_LAUNCHER_TOKEN="your-fixed-launcher-token"
launcher-config.json (persisted):
{
  "port": 18800,
  "launcher_token": "your-fixed-launcher-token"
}
Login Flow
The dashboard exposes three HTTP endpoints:
| Endpoint | Method | Purpose |
|---|---|---|
/login | POST | Authenticate with the launcher token, get a session cookie |
/setup | POST | First-run flow to register a custom token before the dashboard becomes available |
/logout | POST | Invalidate the current session |
You can sign in by:
- Manual input — enter the token on the login page
- URL parameter — visit
http://localhost:18800?token=your-tokenfor automatic login
Security notes:
- Session cookies are HMAC-signed with a fresh 256-bit key generated per process startup, so all existing sessions are invalidated when the launcher restarts
- Session cookies are valid for approximately 7 days after login
- The login endpoint has brute-force protection (rate limit per minute)
- All responses include
Referrer-Policy: no-referrerto reduce token leakage via the Referer header
Custom Token via WebUI
Custom Token Best Practices
Generating Secure Tokens
Recommended methods for generating secure random tokens:
# OpenSSL
openssl rand -hex 32

# Python
python3 -c "import secrets; print(secrets.token_hex(32))"

# Node.js
node -e "console.log(require('crypto').randomBytes(32).toString('hex'))"
Token Storage Recommendations
| Storage Method | Security | Use Case |
|---|---|---|
.security.yml | ⭐⭐⭐ High | Production (recommended) |
| Environment variable | ⭐⭐ Medium | Container deployment, CI/CD |
config.json | ⭐ Low | Development/testing only |
Security Configuration Example
.security.yml:
channels:
  pico:
    token: "a1b2c3d4e5f6g7h8i9j0k1l2m3n4o5p6"
  telegram:
    token: "123456789:ABCdefGHIjklMNOpqrsTUVwxyz"
  discord:
    token: "your-discord-bot-token"
.gitignore:
.picoclaw/.security.yml
Pico Client Configuration
To connect as a client to a remote Pico Server, configure Pico Client:
{
  "channels": {
    "pico_client": {
      "enabled": true,
      "url": "ws://remote-server:18790/pico",
      "token": "your-secure-token-here"
    }
  }
}
Or via environment variables:
export PICOCLAW_CHANNELS_PICO_CLIENT_ENABLED=true
export PICOCLAW_CHANNELS_PICO_CLIENT_URL="ws://remote-server:18790/pico"
export PICOCLAW_CHANNELS_PICO_CLIENT_TOKEN="your-secure-token-here"
FAQ
Q: What if Token authentication fails?
- Check if Token is correctly configured
- Verify request header format:
Authorization: Bearer <token>(note the space after Bearer) - If using URL Query method, confirm
allow_token_queryis enabled
Q: How to rotate Tokens?
- Update the Token in
.security.ymlor environment variable - Restart PicoClaw Gateway
- Update client configuration with the new Token
Q: How can multiple clients use different Tokens?
Current Pico Channel version supports only a single Token. For multi-user scenarios, we recommend:
- Using other Channels that support multi-user (e.g., Telegram, Discord)
- Implementing multi-Token validation through a reverse proxy